DIY concrete polishing transforms dull floors into stunning, professional-grade surfaces. With the right tools and technique, property owners can achieve impressive results at a fraction of professional costs.
We at Wirth Floor see many Brisbane homeowners successfully tackle this project. The key lies in understanding proper preparation, selecting correct diamond grits, and following systematic grinding steps.
What Equipment Do You Actually Need?
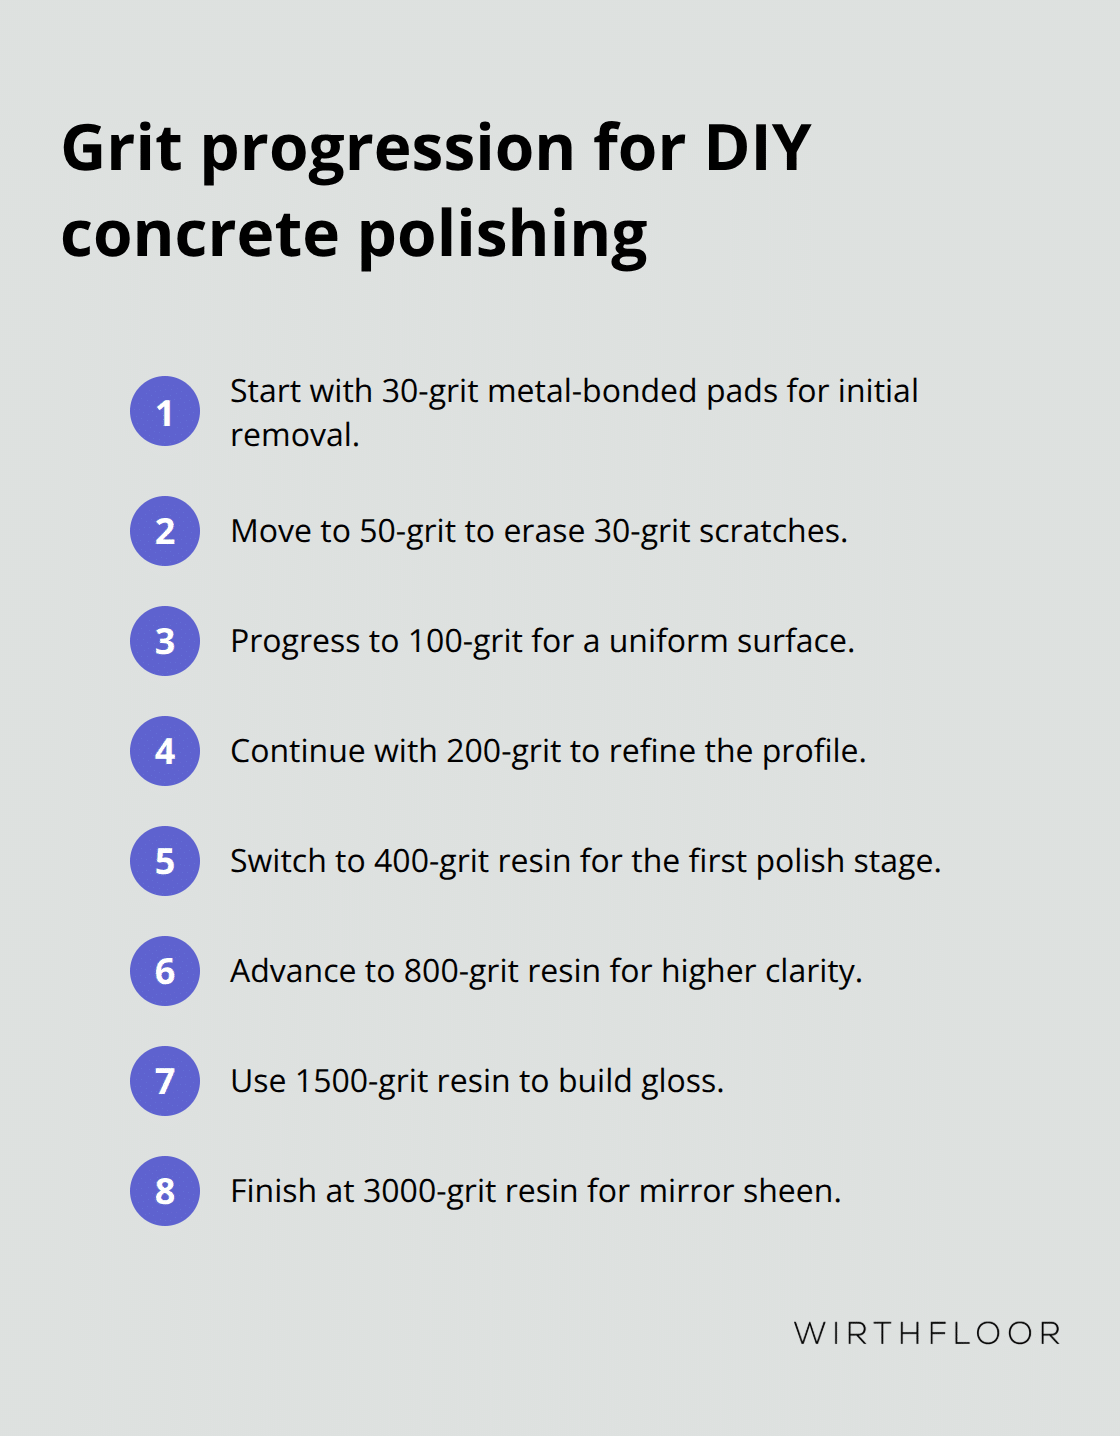
Success in DIY concrete polishing depends on the right equipment from day one. A planetary grinder with variable speed control handles surface preparation best, while smaller angle grinders work for edges and tight corners. Rent a machine that weighs at least 175 pounds for proper pressure. Diamond pads start at 30 grit for initial surface removal, progress through 50, 100, 200 grit metal bonds, then switch to resin bonds at 400, 800, 1500, and 3000 grit for final polish. Most Brisbane rental shops stock complete grit sequences, but verify availability before you start your project.
Professional-Grade Safety Equipment
Concrete dust contains silica that damages lungs permanently. Use a P2-rated respirator mask, not basic dust masks that offer zero protection against fine particles. Safety glasses with side shields prevent concrete chips from eye injuries.
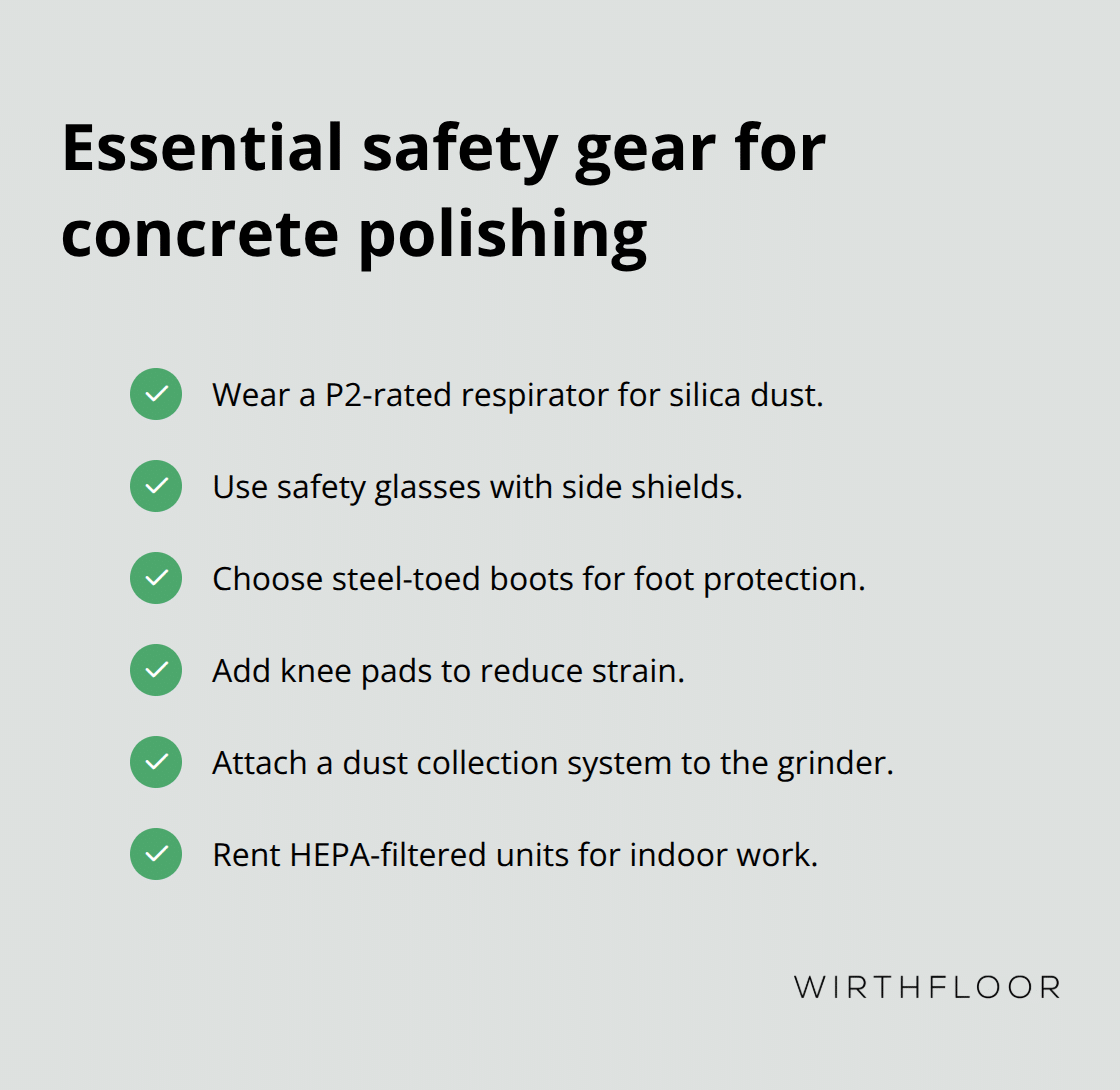
Steel-toed boots protect feet from dropped equipment, while knee pads reduce strain during detail work. A dust collection system attached to your grinder cuts airborne particles by over 90 per cent according to occupational safety studies. Rent units with HEPA filtration for indoor projects.
Surface Preparation Tools That Matter
Floor assessment starts with a moisture meter to check concrete moisture levels. According to ASTM standards, concrete slabs need relative humidity at or below 75 per cent for proper flooring installation. Crack repair requires hydraulic cement and a margin trowel for permanent fixes. Self-levelling compound addresses minor surface irregularities before you begin. Shot blasters remove stubborn coatings faster than standard methods alone. Chemical densifiers applied after initial work fill concrete pores and create harder surfaces. Most concrete supply stores in Gold Coast stock these materials, but call ahead to confirm availability for weekend projects.
Diamond Pad Selection Strategy
Metal-bonded diamonds handle aggressive material removal during initial stages. These pads cut through surface imperfections and expose fresh concrete underneath. Resin-bonded pads create the smooth, reflective finish you want in later stages. Each grit level removes scratches from the previous step (never skip grit levels or you’ll create uneven surfaces). Store pads in dry conditions between uses to prevent premature wear. Quality pads cost more upfront but deliver consistent results throughout your project.
With your equipment ready and safety measures in place, proper surface preparation becomes your next priority for professional results.
How Do You Actually Polish Concrete
Start with thorough surface assessment using your moisture meter to verify concrete moisture stays below 70 per cent relative humidity.

Clean the entire floor area with industrial degreaser, then fill all cracks wider than 1/8 inch using hydraulic cement mixed to manufacturer specifications. Allow crack repairs to cure for 24 hours minimum before you proceed. Check floor flatness with a 10-foot straightedge – variations that exceed 1/8 inch over 10 feet require self-levelling compound application. Remove all existing coatings, paint, or sealers using your 30-grit metal-bonded diamond pads attached to the planetary grinder.
Progressive Grinding Technique
Begin grinding with 30-grit metal-bonded diamonds at slow speed, making overlapping passes in perpendicular directions to prevent swirl marks. Progress through 50, 100, then 200-grit metal bonds, spending equal time at each stage to remove scratches from the previous grit. Apply chemical densifier after 100-grit stage, allowing 30 minutes penetration time before you continue. Switch to resin-bonded pads starting at 400-grit, then advance through 800, 1500, and 3000-grit for mirror finish. Each grit level requires complete floor coverage with consistent pressure – rushing this stage creates uneven sheen patterns that you cannot correct later.
Sealing and Final Protection
Clean all grinding residue using HEPA vacuum followed by damp microfibre mop with pH-neutral cleaner. Apply penetrating sealer in thin, even coats using microfibre applicator pad, maintaining wet edge to prevent lap marks. Wait 45 minutes between coats for proper curing. Most Brisbane projects require two sealer coats for adequate protection against stains and moisture penetration. Test final gloss level using 60-degree gloss meter – properly polished concrete should read between 70-90 gloss units (depending on your target finish level).
Quality Control Checkpoints
Inspect your work at each grit stage under bright lighting to identify missed areas or inconsistent patterns. Run your hand across the surface to feel for rough spots that need additional attention. Document problem areas with photos to track your progress through each stage. Professional contractors typically spend 15-20 minutes per 100 square feet at each grit level to achieve consistent results.
Even with perfect technique, DIY polishing projects face common pitfalls that can compromise your final results.
What Kills DIY Concrete Polishing Projects
Most DIY concrete polishing failures happen before you even turn on the grinder. Surface assessment takes 30 minutes but prevents weeks of frustration later. Concrete subfloors must be at service temperature and relative humidity for at least 48 hours prior to testing. Temperature variations greater than 10 degrees Celsius during application create uneven patterns that show as permanent discolouration. Check for existing sealers with water droplet tests – water should penetrate within 30 seconds on unsealed concrete. Hidden coatings cause diamond pad problems and create streaky finishes that require complete restart. Structural cracks wider than 2mm indicate foundation movement that makes polish pointless until you address underlying issues. Brisbane homeowners skip these checks and waste entire weekends on surfaces that cannot hold a proper finish.
Grit Sequence Disasters That Ruin Everything
Wrong grit progression destroys concrete surfaces permanently. You jump from 30-grit directly to 200-grit and leave deep scratches that no amount of fine polish removes. Each grit level removes exactly 80 per cent of scratches from the previous stage – skip levels and you create uneven surfaces with visible swirl patterns. Excessive pressure during work generates heat that glazes concrete surfaces and prevents proper bond with subsequent grits. Planetary grinders need consistent 2-3 mph walk speed with 50 per cent overlap between passes. Fast work saves zero time because you spend double effort on corrections. Diamond pad problems occur when you apply too much pressure or move too slowly, which creates glazed spots that require aggressive re-work. Professional contractors measure surface profile depth at each stage with replica tape – depths should decrease consistently from 150 microns at 30-grit to 5 microns at final polish.
Dust Control Failures That Cost Everything
Poor dust collection turns polish work into demolition cleanup. Concrete dust settles into microscopic surface pores and prevents proper sealer penetration, which causes premature wear patterns within months. HEPA filtration removes at least 99.97% of dust, pollen, mould, bacteria, and airborne particles with a size of 0.3 microns, while basic shop vacuums capture only visible debris. Wet work creates slurry that clogs diamond segments and requires complete pad replacement mid-project. Airborne silica exposure above 0.1 mg per cubic metre causes permanent lung damage (according to Safe Work Australia standards). Concrete grinding involves mechanical removal of surface imperfections and contaminants that create these dust problems. Clean surfaces between each grit stage with tack cloths followed by HEPA vacuum – residual particles create scratches during finer work stages.
Final Thoughts
DIY concrete polishing works well for smaller residential projects under 200 square metres with minimal surface damage. Commercial spaces, floors with extensive cracks, or projects that require custom patterns need professional expertise. We at Wirth Floor handle complex installations where precision matters most.
Professional services cost $75-100 per square metre for mechanically polished floors, while DIY projects run $25-35 per square metre (including equipment rental). The price difference narrows when you factor in tool rental, material waste, and potential rework costs. Most Brisbane homeowners save money on straightforward projects but face higher costs when mistakes occur.
Polished concrete requires pH-neutral cleaners and annual sealer reapplication for proper maintenance. Acidic cleaners etch surfaces permanently and destroy the finish you worked hard to create. For Brisbane property owners who want professional installation, Wirth Floor delivers quality craftsmanship in polished concrete solutions.